In this tutorial we are creating a basic solution for displaying the schedule of an aircraft fleet. To install FlexGanttFX please follow the instructions found in Installation.

Let’s start by creating a view model for the Gantt chart. Our objects are Fleet, Aircraft, Crew, and
Flight. Instances of Flight will be shown as a horizontal bar in the graphics area of the Gantt chart while
the first three will be displayed in the rows of the tree table area. Fleet, Aircraft, and Crew share a
common superclass called ModelObject, an extension of Row. The Row class is being used to define a hierarchical
data structure by the help of three type arguments: the first one specifies the type of the parent row, the second one
the type of the children rows, and the third one the type of activities that will be shown on the right-hand side of
the Gantt chart.
    P extends Row<?,?,?>, // Type of parent row
    C extends Row<?,?,?>, // Type of child rows
    A extends Activity> extends Row<P, C, A> { }
We can now pass ModelObject as a type argument when creating an instance of a GanttChart control. This informs the
control that all rows will have this common supertype.
GanttChart<ModelObject<?,?,?> gantt = new GanttChart<>()
The Aircraft model class can be implemented as shown in the following code fragment, assuming that a fleet consists of
several aircraft, each aircraft having a crew, and flights being assigned to aircraft and crews.
public class Aircraft extends ModelObject<Fleet, Crew, Flight> {
    public Aircraft(String name) {
        super(name);
    }
}
The Flight class extends MutableActivityBase and might look like this:
public class Flight extends MutableActivityBase<FlightData> {
    public Flight(FlightData data) {
        super(data.getFlightName()); // the activity name
        setStartTime(data.getFlightDepartureTime()); // times as java.time.Instant
        setEndTime(data.getFlightArrivalTime());
        setUserObject(data); // a user object according to the type argument above
    }
}
This class defines a flight as a mutable activity, which means that the user can edit / modify the flight. We can
also see that the activity gets its information from a domain object of type FlightData. Supporting a user object
allows us to create a link between the domain model and the view model. All that is left to do now is to add the
activities (the flights) to the rows (the aircraft). For this we can simply call the method Row.addActivity(Layer, Activity).
Rows do not store activities themselves, instead they are delegating all activity-related
functionality to a repository of type ActivityRepository. The default repository is of type IntervalTreeRepository.
Applications can implement their own repositories and register them by calling Row.setRepository().
Layers are used to create groups of activities so that they can be shown / hidden together. In our example we want to group flights based on their service type (cargo, charter, training, etc…).
Layer cargoLayer = new Layer("Cargo");
Layer trainingLayer = new Layer("Training");
Layer charterLayer = new Layer("Charter");

// make layers known to Gantt
gantt.getLayers().addAll(cargoLayer, trainingLayer, charterLayer);
Now the Gantt chart knows which layers it needs to render, and we can create the link between the layers and the activities. This is done when we add the activities to the rows (here: add flights to aircraft).
Flight flight1 = new Flight(); // a cargo flight
Flight flight2 = new Flight(); // a training flight
Flight flight3 = new Flight(); // a charter flight

aircraft1.addActivity(cargoLayer, flight1);
aircraft1.addActivity(trainingLayer, flight2);
aircraft2.addActivity(charterLayer, flight3);
In the following code sample we are combining all the steps from above.
import javafx.application.Application;
import javafx.scene.Scene;
import javafx.stage.Stage;
import com.flexganttfx.model.Activity;
import com.flexganttfx.model.Layer;
import com.flexganttfx.model.Row;
import com.flexganttfx.model.activity.MutableActivityBase;
import com.flexganttfx.view.GanttChart;

public class MyFirstGanttChart extends Application {

    /*
     * Common superclass of Fleet, Aircraft, and Crew.
     */
    class ModelObject<
        P extends Row<?,?,?>, // Type of parent row
        C extends Row<?,?,?>, // Type of child rows
        A extends Activity> extends Row<P, C, A> { }

    class Fleet extends ModelObject<Row<?,?,?>, Aircraft, Activity> { }

    class Aircraft extends ModelObject<Fleet, Crew, Flight> { }

    class Flight extends MutableActivityBase<Object> { }

    @Override
    public void start(Stage stage) throws Exception {
        // Our root object.
        Fleet fleet = new Fleet();
        fleet.setExpanded(true);

        // Create the control.
        GanttChart<ModelObject<?,?,?>> gantt = new GanttChart<>(fleet);

        // Layers based on service type.
        Layer cargoLayer = new Layer("Cargo");
        Layer trainingLayer = new Layer("Training");
        Layer charterLayer = new Layer("Charter");
        gantt.getLayers().addAll(cargoLayer, trainingLayer, charterLayer);

        // Create the aircrafts.
        Aircraft aircraft1 = new Aircraft();
        Aircraft aircraft2 = new Aircraft();

        // Add the aircrafts to the fleet.
        fleet.getChildren().addAll(aircraft1, aircraft2);

        // Create the flights
        Flight flight1 = new Flight(); // a cargo flight
        Flight flight2 = new Flight(); // a training flight
        Flight flight3 = new Flight(); // a charter flight
        aircraft1.addActivity(cargoLayer, flight1);
        aircraft1.addActivity(trainingLayer, flight2);
        aircraft2.addActivity(charterLayer, flight3);

        Scene scene = new Scene(gantt);
        stage.setTitle("Fleet Schedule");
        stage.setScene(scene);
        stage.centerOnScreen();
        stage.sizeToScene();
        stage.show();
    }

    public static void main(String[] args) {
        Application.launch(args);
    }
}
The image below shows what we will see when we run this code.
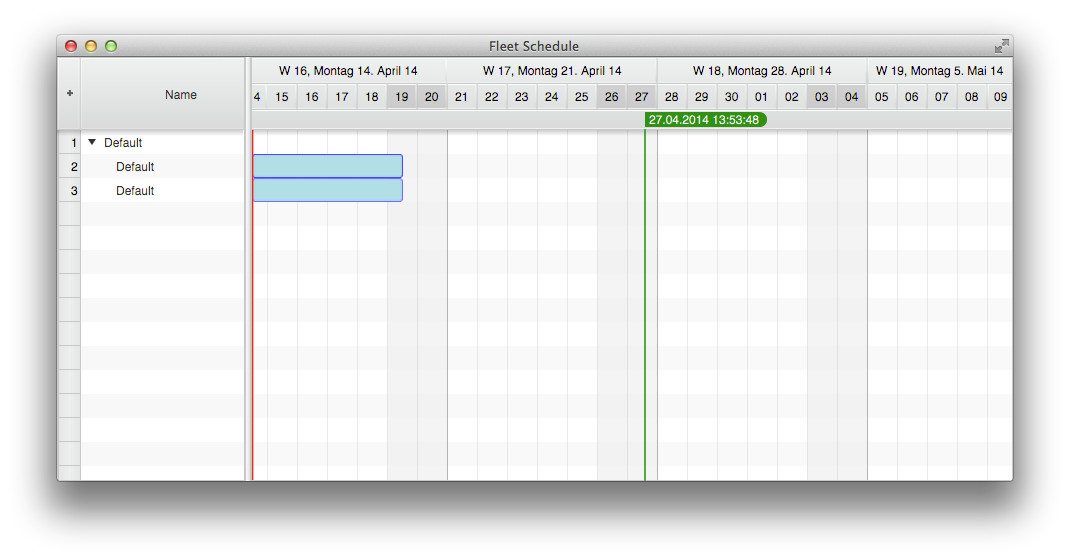
This result is not bad for just a few lines of code, however, the rendering of the flights is not attractive at all. We
can customize their appearance by registering a different ActivityRenderer for the activity type Flight. This is done
by calling the method GraphicsBase.setActivityRenderer() where the graphics view is the control on the right-hand side
of the Gantt chart. It is responsible for rendering all activities. We can add the following lines to our example from
above.
GraphicsView <ModelObject<?, ?, ?>> graphics = gantt.getGraphics();
graphics.setActivityRenderer(Flight.class,
                    GanttLayout.class,
                    new ActivityBarRenderer<>(graphics, "FlightRenderer"));
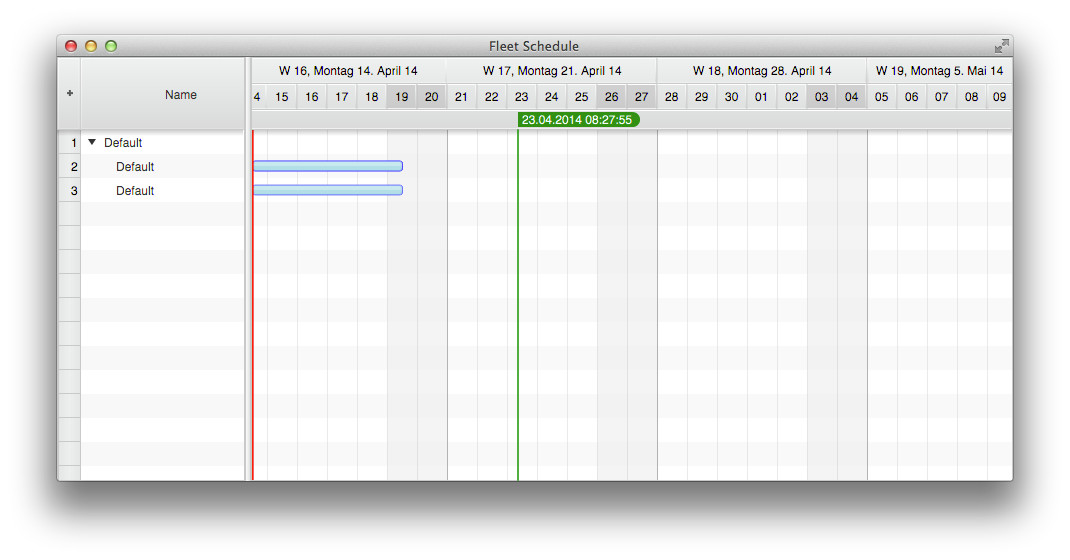
This replaces the default activity renderer with a renderer that draws a fixed-height bar. Interesting about this code is that we are not only passing the activity type and the renderer instance but also a layout type. We don’t want to spend too much time on layouts in the context of this quick start guide, but let’s just say that FlexGanttFX is capable of displaying activities in several different ways (as time bars, as chart entries, as agenda entries). Our example now looks like this:
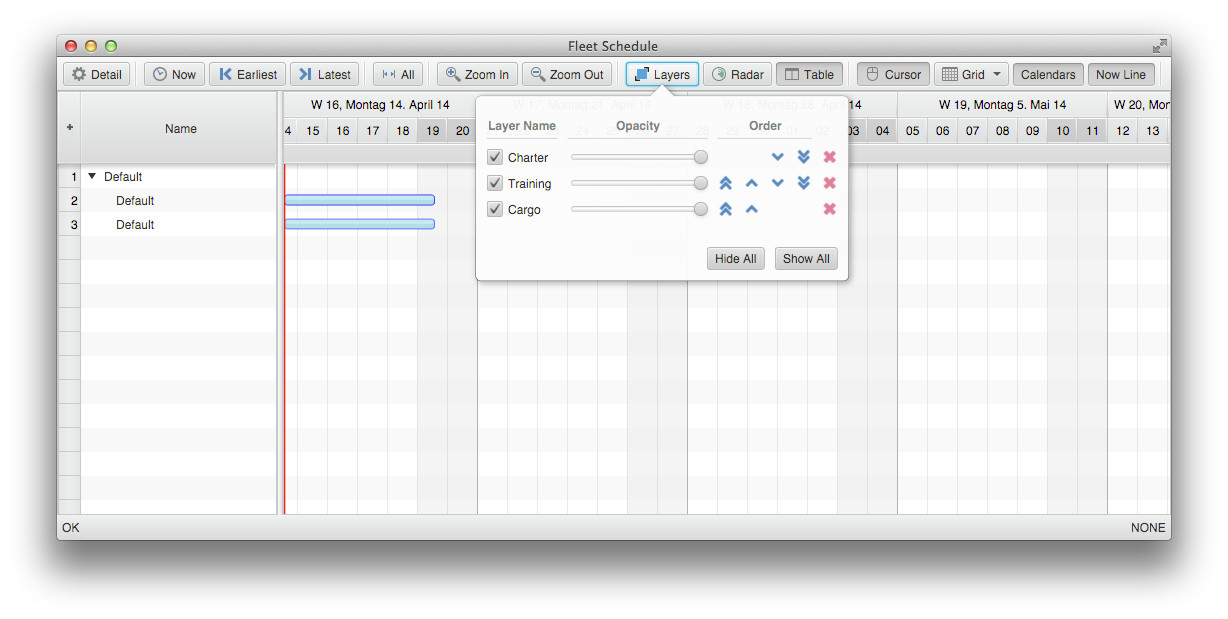
We can now add a GanttChartToolBar and a GanttChartStatusBar to the example. This allows us to perform actions on the
chart and also to verify that the layers have been added properly. The “extras” library of FlexGanttFX contains
additional controls such as a GanttChartStatusBar and GanttChartToolBar. By using the standard BorderPane it is
easy to combine the Gantt chart and those two controls to create a single complex control.
BorderPane borderPane = new BorderPane();
borderPane.setTop(new GanttChartToolBar(gantt));
borderPane.setCenter(gantt);
borderPane.setBottom(new GanttChartStatusBar(gantt));

Scene scene = new Scene(borderPane);
Our example will now look like this after clicking on the layers button in the toolbar.
Now that we have visualized our data, we obviously want to interact with it, and we want to be informed about the changes
that we make. Our activities are, by default, editable. This means we can drag them horizontally or vertically. To
receive events, we only need to register an ActivityEvent handler with the graphics view control by calling
GraphicsBase.setOnActivityChanged().
For the sake of this tutorial, we will simply register a handler that will print the event to the console. This can be accomplished like this:
graphics.setOnActivityChanged(evt -> System.out.println(evt));
When we run our application again, we will now see the following output:
event type: DRAG_STARTED, time interval: 2014-04-17T21:45:00Z - 2014-04-22T21:30:00Z,
    value (chart value / percentage complete): 0.0,
    activity "null from 2014-04-18T12:15:00Z until 2014-04-23T12:00:00Z,
    user object = null",
    row = "Default",
    layer = "Training"

event type: DRAG_ONGOING, time interval: 2014-04-17T21:45:00Z - 2014-04-22T21:30:00Z,
    value (chart value / percentage complete): 0.0,
    activity "null from 2014-04-18T12:15:00Z until 2014-04-23T12:00:00Z,
    user object = null",
    row = "Default",
    layer = "Training"

event type: DRAG_FINISHED, time interval: 2014-04-17T21:45:00Z - 2014-04-22T21:30:00Z,
    value (chart value / percentage complete): 0.0,
    activity "null from 2014-04-18T03:00:00Z until 2014-04-23T02:45:00Z,
    user object = null",
    row = "Default",
    layer = "Training"
Please notice the three different event types DRAG_STARTED, DRAG_ONGOING, and DRAG_FINISHED The first one gets
fired when the user initiates a drag, the second while the drag is still in progress, and the third one when
the drag has finished. This pattern can be observed in JavaFX itself, and it was implemented throughout FlexGanttFX
as well. Make sure to take a look at the various event types defined in the ActivityEvent class to find out how much
information you can receive when the user performs editing operations.